Managing and maintaining your Mac can be frustrating when confronted with errors. An error message may arise: “Erase Assistant is not Supported on This Mac.”
This error commonly occurs when attempting to erase or reformat your Mac’s disk using the built-in Erase Assistant utility.
The Erase Assistant tool is an essential component of macOS, allowing users to securely wipe their disks, reinstall macOS, or format their drives for various purposes.
However, the manifestation of this error message indicates that your Mac cannot proceed with the intended disk erasure or formatting procedure.
This article will delve into the potential causes underlying the “Erase Assistant is not Supported on This Mac” error and present you with effective troubleshooting techniques to resolve it.
So, let’s dive into the troubleshooting solutions to fix the “Erase Assistant is not Supported on This Mac” error and get your Mac back on track for disk erasure and formatting.
Before you enter the procedures, make sure your Mac is working correctly. If you need help with universal controls, find easy ways to fix universal control not working on Mac, and then proceed.
Let’s get started!!
Table of Contents
What is Erase Assistant?

However, the Mac platform only had this feature briefly, requiring a time-consuming process involving manual logout, disk erasure, and macOS reinstallation.
With the release of macOS Monterey, Apple introduced Mac’s version of Erase All Content and Settings, known as the Erase Assistant.
This tool simplifies resetting your Mac to its factory settings and erasing all data before reinstalling macOS with just one click.
However, there are instances where users encounter an error message stating, “Erase Assistant is not Supported on This Mac.”
This error indicates that the Erase Assistant feature is incompatible with your Mac. Specifically, it suggests you use an Intel-based Mac without the T2 Security Chip.
To address this issue, consider alternative methods for erasing your Mac or upgrading to a compatible Mac model that supports the Erase Assistant feature.
Ensure your Mac meets the requirements and stays informed about the latest updates to enjoy a seamless user experience.
If you are a gaming buff, you can play games like Maplestory on Mac and watch the NFL games on the Macbook too.
What Should You Do if Erase Assistant is Not Supported on This Mac?
The Erase Assistant is a recent addition to Mac’s features, designed to facilitate the erasure of a Mac without requiring a visit to macOS Recovery.
You may avail of the Erase Assistant on your Mac, provided you meet the following criteria:
- You have an Apple silicon-based Mac (M-series chip) or an Intel-based Mac with the Apple T2 Security Chip.
- Your Mac runs macOS Monterey (or Ventura) or a later version.
If you are unsure whether your Intel Mac includes a T2 security chip, the following list of Intel-powered Macs is compatible with Erase Assistant:
- MacBook Air [Retina; 13-inch; 2018, 2019, 2020]
- MacBook Pro [13-inch; 2018, 2019, 2020]
- MacBook Pro [15-inch; 2018, 2019]
- MacBook Pro [16-inch; 2019]
- Mac Mini [2018]
- Mac Pro [2019]
- iMac [Retina 5K; 27-inch; 2020]
If your Mac fails to meet these requirements, using Erase Assistant to erase its contents becomes unfeasible. Regrettably, there exists yet to be a solution to rectify this error.
You must explore alternative methods to reset your Mac, such as employing Disk Utility to erase all data and reinstall macOS.
How to Check Manually Whether Your Mac Has a T2 Security Chip?
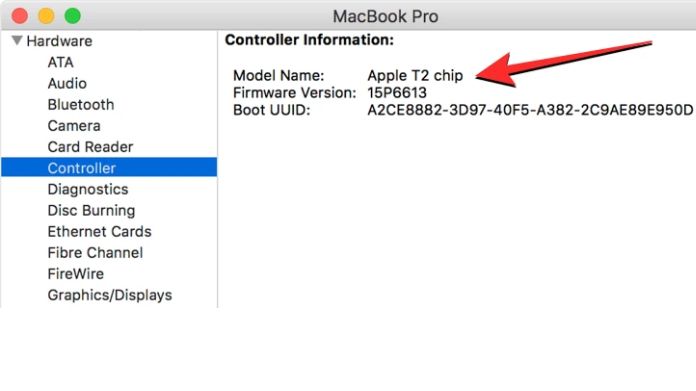
You can also manually check if your Mac has a T2 Security chip by following the steps below,
- Go to the Apple logo (from Menu Bar)
- Then tap on the About this Mac
- Then proceed to the Overview or General
- Then click on the System Report
- Afterward, go through the Controller (iBridge) and check if its Model Name mentions this chip.

Consequently, your device inherently supports Erase Assistant. However, suppose your Mac operates on an older iteration of macOS, and you desire to employ the Erase Assistant to erase its contents.
In that case, we recommend updating your device to macOS Monterey or a subsequent version. You will then have access to the Erase Assistant functionality.
To update your macOS version, navigate to System Preferences and select Software Update.
How to Use Erase Assistant?

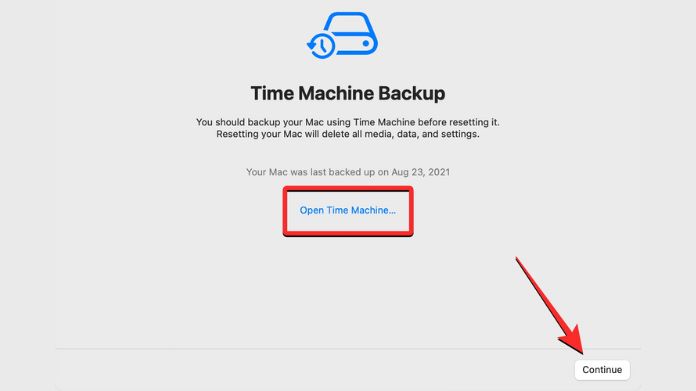
- Use Time Machine or other backup methods to back up your data.
- Go to the Apple menu, tap System Settings, and proceed to General on your Mac.
- Choose Transfer or Reset, then Erase All Content and Settings. (If using macOS Monterey, navigate to the Apple Menu > System.)
- Erase All Content and Settings (Preferences > Erase All Content and Settings.
- Click the Unlock button after entering your administrative password.
- If prompted, sign out of your Apple ID/iCloud account.
- Continue by clicking the button.
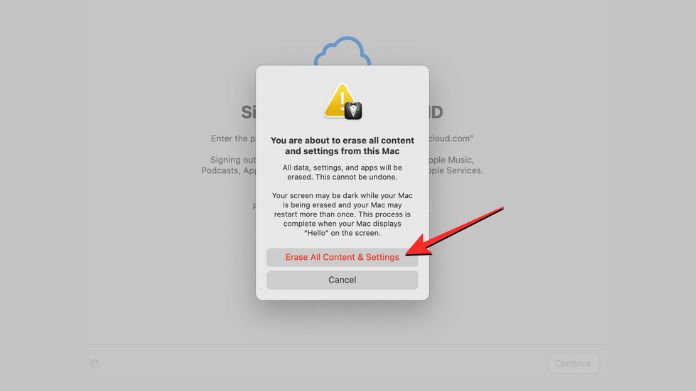
- Then, on the right, click Erase All Contents and Settings.
- Allow your Mac to restart and show a blank screen with a progress meter.
- When your Mac boots up, you can configure it.

Final Takeaway!!
By checking the system requirements, updating your macOS version, and contacting Apple Support for further assistance, you can increase your possibilities of resolving the error and accessing the Erase Assistant feature.
Remember to stay informed about your Mac’s latest updates and compatibility requirements to ensure a smooth user experience.

