iOS is widely acclaimed for launching thoughtful features to maximize the user experience. One such feature attracting all eyes and ears nowadays is the personal Voice on iOS 17.
It is as unique as it sounds and is helpful for those at risk of losing their voices. Personal Voice is a handy option that artificially generates a voice similar to yours.
Isn’t it sound amazing?
But since this feature was recently added to Apple’s library, most users must be aware of its usage. Hence, we have compiled a comprehensive tutorial covering all vital aspects of personal Voice iOS 17 and step-by-step instructions to use it.
In addition, if you are new to the Apple landscape, take a peek at our other iOS guides, including how to cancel your iCloud storage plan and download NU Carnival iOS.
Let the tutorial begins!!
Table of Contents
Basics of Personal Voice on iOS
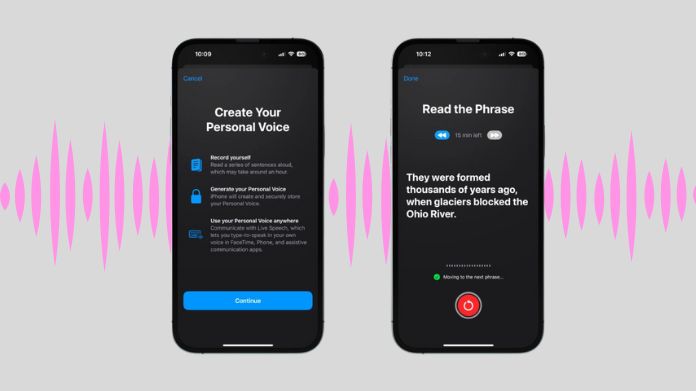
It helps those who need their Voice to talk on their behalf. This innovative feature utilizes on-device machine learning to analyze recorded audio clips and creates a personalized voice model directly on the user’s iPhone.
Once you create your voice model, you can use Live Text to type out or select predefined phrases to have them spoken out loud in your Voice during phone calls.
According to Apple, this feature is primarily launched for those with Amyotrophic Lateral Sclerosis or other conditions.
However, it should be noted that the personal Voice was launched with iOS 17. Hence, the feature will only be compatible with iOS 17-powered devices.
If your device currently uses iOS 16/ 15 and you constantly get an update requested ios 16/15 error message, don’t panic and read our expert guide to fix the issue.
PersonalVoice iOS 17 empowers individuals to communicate effectively with their near and dear ones.
All recorded data will be saved and processed locally on the device, thus ensuring maximum privacy. This secure approach lets you utilize your Voice with Live Speech seamlessly.
How to Set Up Personal Voice on iOS 17?
Now that you know the basics of Personal Voice on iOS 17, it’s time to learn the instructions to set it up. You must need iOS 17 or higher to use this feature.
So, before creating a personal voice model, update your device to iOS 17 to avoid any last-minute glitches. You can do so by visiting Settings > General > Software Update.
Once your device has been updated, follow the steps below to set up personal Voice on iOS 17.
- Unlock your device and go to the Setting app.
- Select Accessibility and scroll down to the Personal Voice option.
- Tap “Create a Personal Voice” and select the “Continue” button.
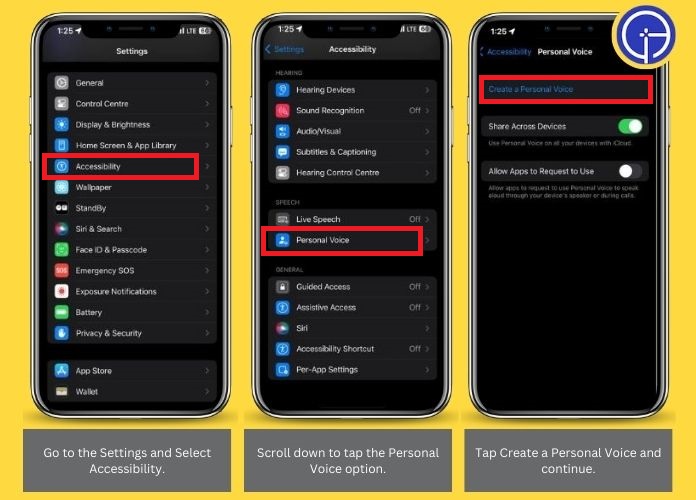
- When prompted, Click the Continue button again and move to the next step.
- Now, it’s time to give your Voice a name. Once done, select the Continue button.
- Tap the “Record” icon and narrate the phrases as they appear.
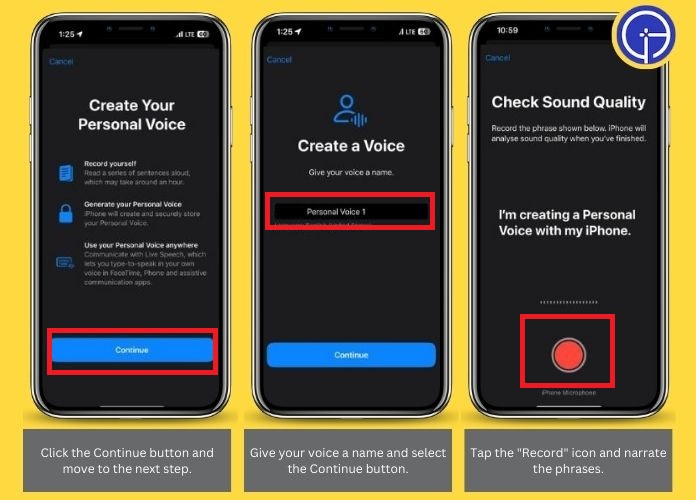
- Wait for the recording to end and tap the Stop icon.
- Select the Listen option to hear your recorded audio.
- Be mindful of your background environment, and make sure it isn’t noisy or disturbing. If your background has noises, you’ll be notified. Users can then move to somewhere quiet and tap Check Again to keep recording.
- Once you complete the sound check, you’ll have to finish a 15-minute voice-over session to narrate the lines as they appear.
- Tap Preview to understand how the line sounds, and select the Record button when you are ready. As you proceed, You’ll see the “Moving to the next phrase” option.
- If you wish to re-record a specific phrase, tap “Replay.” Also, if you want to record these phrases afterward, select Done, and you’ll then be able to continue recording from where you left off.
- As soon as you finish recording your personal Voice on iOS 17, select the Continue button and then Allow notification access.
- Finally, tap Done, and your iPhone will then automatically generate your personal Voice while it charges and the screen is turned off. You will also be notified once your personal Voice is ready to use.
Note: It may take overnight charging over two days to generate a personal voice. And this time varies from one iPhone model to another. Hence, be patient and wait until you receive the notification.
Guide to Using Personal Voice on iOS 17
Note that the only way to use personal Voice iOS 17 is via Live Speech (the new accessibility feature).
With Live Speech, you can type what you wish to say on your iPhone and narrate it using your Voice. Remember to enable the Live Speech feature before jumping into the final process.
To enable Live Speech on iPhone, select Settings > Accessibility > Live Speech. Toggle to help the option, then move to the instructions below.
Those who have already enabled the Live Speech option can skip these steps and jump directly to the below-mentioned guidelines.
Here’s how it works.
- Launch the Settings button and tap on Accessibility.
- Scroll to the Live Speech option and select the “Favorite Phrases” option.
- There, tap the Plus (+) icon and enter a phrase of your preference.
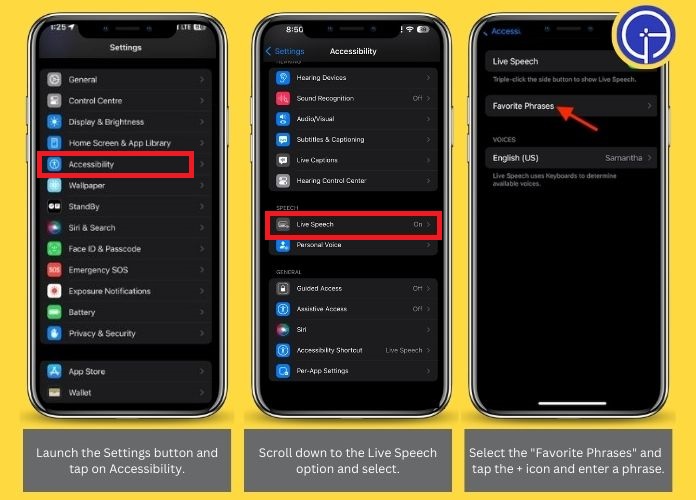
- Select Save and go to the previous page. There, you must click the option under the Voices label.
- Tap Personal Voice and choose the one you generated earlier.
- Now, you can press the Power button thrice to access Live Speech whenever you want a phrase narrated in your Voice.
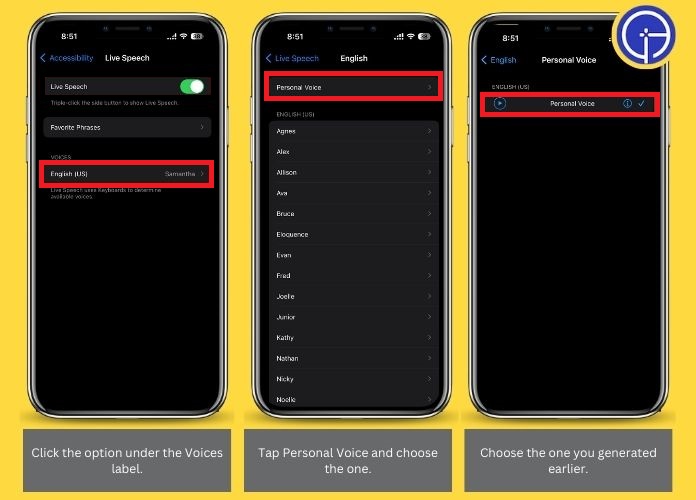
- Enter a phrase you want to be spoken and click Send. Alternatively, you can also select Phrases and select a Favorite Phrase. And here, setting up personal Voice on iOS 17 completes.
Although creating and setting up a personal voice is simple, take all the steps to avoid any last-minute hiccups.
Frequently Answered Questions
Q. How Long Does It Take to Train Personal Voice on iOS 17?
Ans. It might take hours or even days to train personal Voice on iOS 17. make sure to keep the phone connected to a charger with the screen locked to get quick results.
Q. Can I Use Personal Voice on iOS 16?
Ans. No, not at all. Personal Voice is an iOS 17-exclusive feature unavailable for any other iOS version. Users must update their devices before creating and setting up their personal voices on iPhones.
Q. Can Apple Access My Personal Voice Data?
Ans. No. All the recorded voices and data are stored locally on the device, and nobody can access it. Personal Voice is an on-device machine learning, thus ensuring your voice data privacy.
Q. Can I Use My Personal Voice Profile on Multiple Devices?
Ans. Fortunately, Yes. You can use your personal Voice on all compatible iPhones, iPads, or Macs connected with iCloud.
Wrapping Up
We hope you find this guide worth your time and energy. The personal Voice on iOS 17 is one of the most advantageous accessibility features.
It is introduced to help people with cognitive and speech disabilities, thus enabling them to communicate better.
So, what are you waiting for?
Update your iPhone now and make the most of this on-device machine learning model.

